From Estimate to Invoice in QuickBooks Online: Track Approvals, Deposits and Progress Billing Without Retyping
Many small businesses write quotes in Word or Excel, then retype everything into QuickBooks Online (QBO) as an invoice when the job is done. That means entering the same items and prices twice, and keeping side notes on how much deposit was collected, which stage has been billed and what is still left. For contractors, remodelers, caterers, sign shops and IT project firms that work "quote, approve, do the work, bill," one missing note can mean under-billing a customer or billing them twice.
This guide walks through the full flow in QBO: creating and sending an estimate, tracking whether the customer accepted it, collecting a deposit, billing in stages with progress invoicing, and turning the estimate into invoices that stay linked to it. It expands the short "sales flow" section of the series opener, QuickBooks Online Basics for Beginners, into step-by-step instructions.
Who this is for ☐ You build quotes outside QBO and retype them as invoices ☐ You take deposits and aren't sure how they hit the books ☐ You bill large jobs in stages such as 30% / 40% / 30% ☐ You want to see at a glance which estimates were won and which are still waiting
1. What an estimate does (and doesn't do) to your books
The first thing to know: an estimate is a non-posting transaction. Intuit's help explains that estimates don't affect your books until they are converted to an invoice. You can create a hundred estimates and your Profit and Loss and Accounts Receivable won't move. Income and A/R start only when an estimate becomes an invoice.
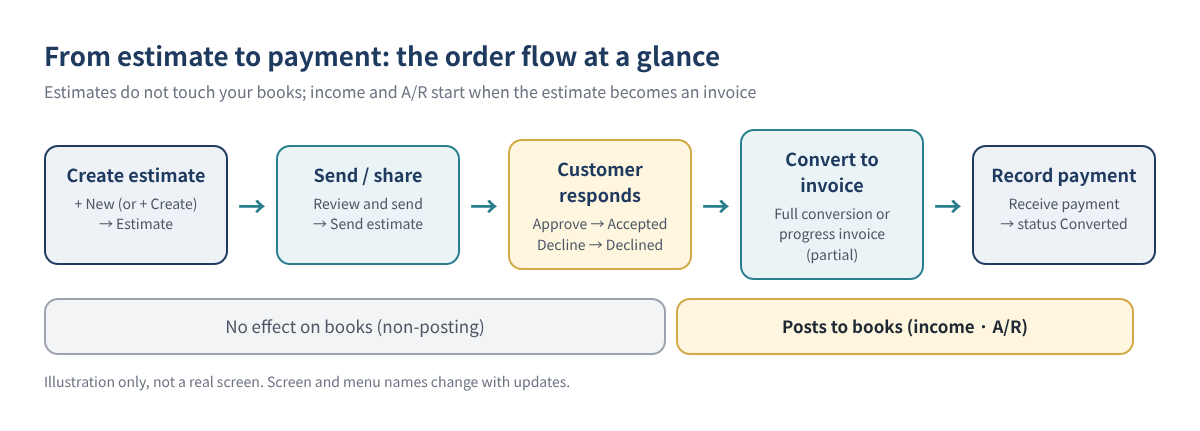
Each transaction type leaves a different footprint, so it helps to keep this table handy.
| Transaction | When you use it | Effect on the books |
|---|---|---|
| Estimate | Proposing a price before work starts | None (non-posting) |
| Deposit on an estimate | Collecting part of the price when the customer accepts | Recorded in a liability account, not A/R, until the estimate becomes an invoice |
| Invoice | Billing an amount to be paid later | Income and A/R increase |
| Receive payment | The customer pays an invoice | A/R decreases, the deposit-to account increases |
Tip The deposit treatment above applies when you use QBO's "deposit on an estimate" feature. If you record deposits some other way (for example, as a separate deposit), the accounting differs, so pick one method and stick with it.
2. Create and send an estimate
Estimates go much faster when your customers and products or services are already set up. If your lists aren't ready yet, see Import customers, vendors and products from Excel first.
- Select + New (on some screens + Create) and choose Estimate. If the menu looks different, type "Estimate" in the search bar.
- Choose the customer. For a new customer, use + Add customer right on the form.
- Enter items, quantities and rates in the Product or service lines. If you plan to bill in stages, split the lines by phase (demolition, materials, installation) so partial billing is easier later.
- To collect a deposit, use the Deposit request field and choose $ (amount) or % (percentage) (see section 5).
- In the ⚙ Manage panel, confirm the status is Pending. To require a signature, turn on Require e-signature here (see section 6).
- Select Review and send → Send estimate. You can also share a link instead of emailing.
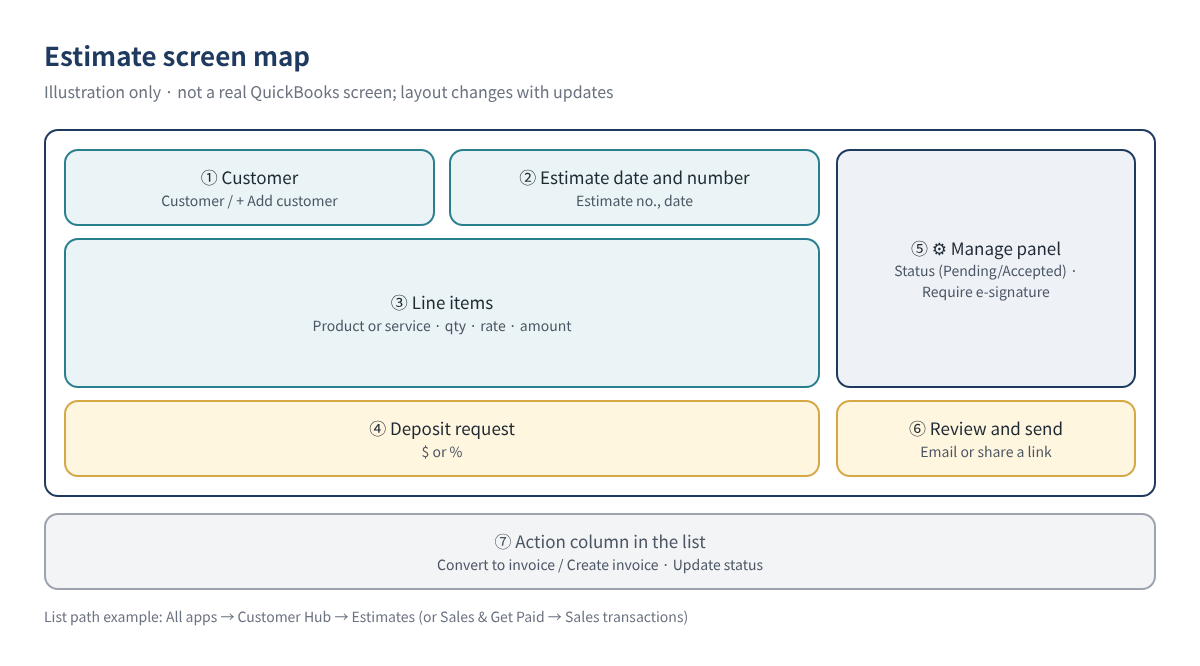
Sent estimates are listed under All apps → Customer Hub → Estimates (or Sales & Get Paid → Sales transactions). The list shows whether a customer has viewed, accepted or declined each estimate. Left-menu names change often; if you can't find it, type "Estimates" in the search bar.
3. Track estimate status: Pending, Accepted, Declined, Converted
A clean estimates list tells you which jobs you won and which quotes need a follow-up call. These are the statuses Intuit's help describes:
| Status | Meaning | How it changes |
|---|---|---|
| Pending | Sent, no answer yet (default) | Automatic for a new estimate |
| Accepted | Customer approved; ready to invoice | Automatic when the customer accepts from the email; set it yourself for a verbal OK |
| Declined (Rejected on some screens) | Customer turned it down | Automatic when declined from the email, or set manually |
| Converted | The full estimate has been invoiced | Automatic once the full amount is invoiced |
To change a status yourself, go to the estimates list, open the Action column dropdown on that row, choose Update status, pick the status and select OK. You can also change it in the ⚙ Manage panel of the estimate.
Watch out Intuit recommends marking a declined estimate as Declined rather than deleting it. Keeping the record lets you measure your win rate and reuse it if the customer comes back. Delete only estimates created by mistake (select it in the list → More actions → Delete).
4. Turn an accepted estimate into an invoice
Only an Accepted estimate can be converted. To revive a declined one, set it back to Pending, resend it and get it accepted. Before converting, decide how you'll bill the job.
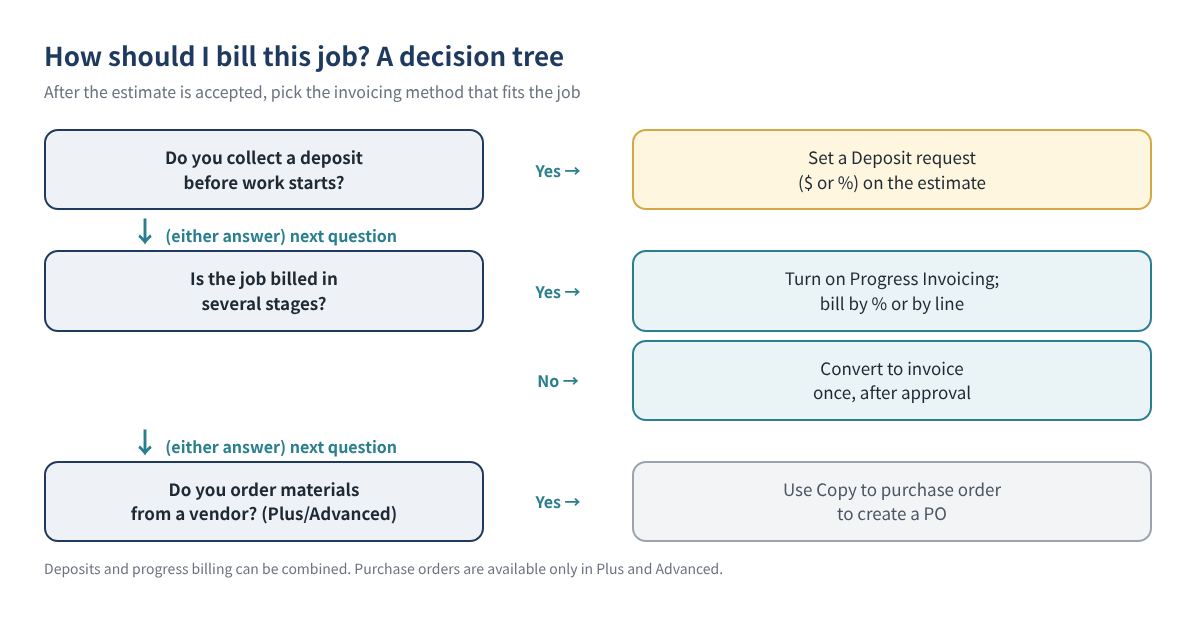
Billing the full amount at once
- Find the accepted estimate in the estimates list (or Sales transactions).
- In the Action column, choose Convert to invoice (shown as Create invoice on some screens).
- An invoice opens with the estimate's lines and amounts. Check the date, terms and due date and edit as needed.
- Select Save or Review and send.
The new invoice is linked to the estimate. Open the invoice and look at Linked transactions to see which estimate it came from.
5. Collect a deposit
If you take money up front, you can request a deposit right on the estimate.
- Open the estimate (View/Edit from Customer Hub → Estimates) or create a new one.
- Next to Deposit request, switch between $ (fixed amount) and % (percent of the estimate total) and enter the value.
- Select Review and send → Send estimate.
- Check the STATUS column in the estimates list to see whether the deposit has been paid.
For the customer to pay the deposit online, you need a QuickBooks Payments merchant account. Without it, the customer can see the deposit amount and approve the estimate but can't pay online.
A paid deposit sits in a liability account until the estimate becomes an invoice, because the work hasn't been done yet. When you convert the estimate, the paid deposit is applied automatically as a partial payment, and the customer is billed only for the balance. Whether QBO converts an estimate to an invoice automatically when a deposit is paid is controlled in ⚙ Settings → Account and settings → Sales → Deposits on estimates (the setting applies to future deposits).
Watch out Intuit's help reminds users to check their state for additional rules on customer deposits. Some industries have limits on deposit size or refund terms, so check your state's rules before you collect.
6. Get an e-signature
A verbal OK can turn into "I never agreed to that price." According to Intuit's help, you can require an e-signature on estimates in QuickBooks Online Simple Start, Essentials, Plus and Advanced.
- On the estimate, open ⚙ Manage → Customization and turn on Require e-signature. It stays on for new estimates until you turn it off.
- The customer types their name in the signature field and accepts. If a deposit is requested, they continue to the deposit payment step.
- The signed PDF is emailed to the customer and to you, and stored with the estimate.
- If you change a line, amount or deposit after signing, the estimate goes back to Pending and the customer must sign again.
7. Bill in stages with progress invoicing
Construction and longer projects are often billed in stages, such as 30% at start, 40% mid-way and 30% at completion. Typing separate invoices each time forces you to track the balance yourself. With progress invoicing, several partial invoices link to one estimate and QBO keeps track of what's left.
Turn it on
- Go to ⚙ Settings → Account and settings → Sales.
- In the Progress Invoicing section select Edit and turn on Create multiple partial invoices from a single estimate.
- Select Save or Done. If you don't see this section, it may depend on your plan or screen version; check your subscription details.
Create a partial invoice
- Open the accepted estimate and choose Convert to invoice, or create a new invoice for the same customer and Add the estimate from the suggested transactions panel on the right.
- QBO asks whether to invoice the entire estimate, a percentage of the work done, or by line item. Choose 30%, for example, and each line is filled at 30%.
- Review the amounts, adjust individual lines if needed, then save and send.
- At the next stage, repeat. The original estimate doesn't change, and you can't bill more than 100% of it.
- Once the full estimate has been invoiced, its status changes to Converted automatically.
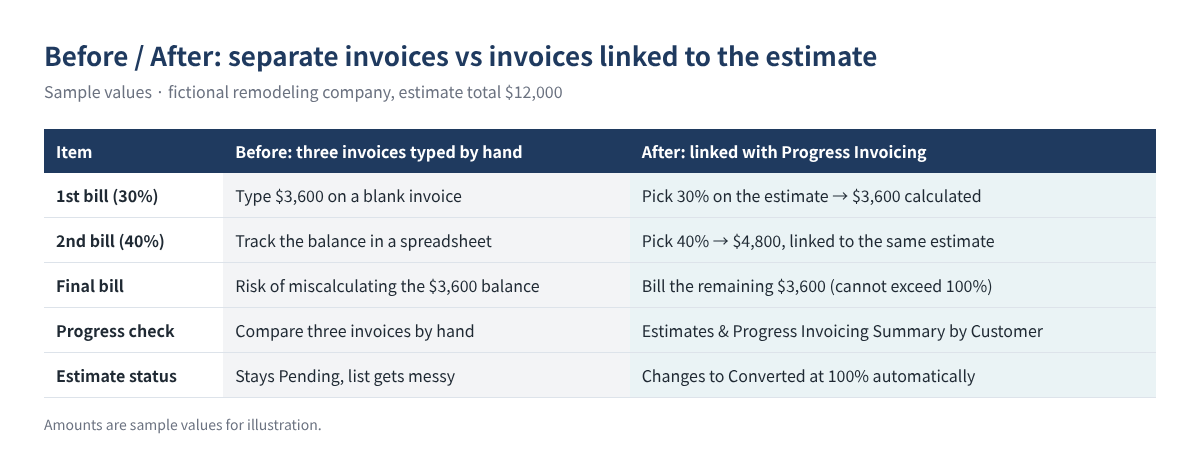
To monitor progress, run Estimates & Progress Invoicing Summary by Customer under Reports. It lists each customer with an open estimate, the amount estimated, the amount invoiced and the amount left to invoice. For a simple list of estimate statuses and linked invoice numbers, use Estimates by Customer.
8. Ordering materials: copy an estimate to a purchase order
If you need to order the estimate's materials from a vendor, you can copy the estimate to a purchase order (PO). Intuit's help states that purchase orders are available only in QuickBooks Online Plus and Advanced.
- First turn on Use purchase orders under ⚙ Settings → Account and settings → Expenses → Purchase orders.
- Items copy only if "I purchase this product/service from a vendor" is checked on the product or service.
- In the dropdown next to the estimate amount, choose Copy to purchase order, pick the vendor and save.
- Intuit notes this option isn't yet available in the new estimate and invoice layout, so if you can't see it, check which layout you're using.
9. Worked example: a remodeling job billed in stages
Assume a fictional remodeler, "Sunrise Interior LLC," quotes a kitchen job to Customer A (fictional). Sales tax is left out to keep the example simple.
| Estimate #1045 line | Estimate | Bill 1 (30%) | Bill 2 (40%) | Final (remaining) |
|---|---|---|---|---|
| Demolition | $2,000 | $600 | $800 | $600 |
| Cabinets and materials | $6,000 | $1,800 | $2,400 | $1,800 |
| Installation labor | $4,000 | $1,200 | $1,600 | $1,200 |
| Total | $12,000 | $3,600 | $4,800 | $3,600 |
Sample values
- Create estimate #1045, require an e-signature and send it. When the customer signs and accepts, the status becomes Accepted. Nothing has posted yet.
- At start of work, create the first invoice at 30% ($3,600). Income and A/R each increase by $3,600.
- After materials are delivered, create the second invoice at 40% ($4,800).
- At completion, invoice the remaining $3,600; the estimate changes to Converted. The three invoices add up to the $12,000 estimate.
- Record each payment with Receive payment, and in the bank feed use Match rather than adding it as new income (see QuickBooks Online Bank Feeds Explained).
For smaller jobs, the same company might use a deposit instead:
| Step | Amount | What hits the books |
|---|---|---|
| Send estimate #1052 (bathroom faucet replacement, 25% deposit) | $2,000 / deposit $500 | Nothing |
| Customer accepts and pays the deposit | $500 | Liability account $500 |
| Convert to invoice after the work | $2,000 | Income $2,000; $500 deposit applied as partial payment |
| Balance received | $1,500 | A/R back to zero |
Sample values
10. Common mistakes
- Creating a fresh invoice instead of converting the estimate → The estimate stays Pending or Accepted and your pipeline is wrong. Always convert from the estimate or Add it from suggested transactions.
- Recording a deposit as income right away → Money for work not yet done shows as income, and income can be doubled when the invoice is created later.
- Adding customer payments from the bank feed as new income → A payment already recorded with Receive payment is counted twice. Match it instead.
- Editing a signed estimate without telling the customer → The estimate returns to Pending and needs a new signature.
- Deleting declined estimates → You lose your sales history. Mark them Declined.
11. FAQ
Does an estimate count as income?
No. Estimates are non-posting, so they don't affect your Profit and Loss or Balance Sheet until converted to an invoice.
The customer approved by phone. What do I do?
In the estimates list, use the Action column's Update status and choose Accepted. To reduce disputes, an e-signature is the safer record when possible.
Where does a deposit go in the books?
With QBO's estimate deposit feature, the deposit is recorded in a liability account, not A/R, until the estimate is converted; on conversion it is applied as a partial payment.
I can't find progress invoicing.
Turn it on first under Settings → Account and settings → Sales. If it still doesn't appear, availability may depend on your plan and screen version; check your subscription and Intuit's help.
Can I set an expiration date on an estimate?
The Intuit help articles reviewed for this guide don't cover estimate expiration dates. Check whether your form has such a field; if not, state the validity period in the message or memo.
12. Checklist
- ☐ Frequent customers and products/services are set up in your lists
- ☐ Jobs billed in stages have estimate lines split by phase
- ☐ You use one deposit method consistently (estimate deposit request or not)
- ☐ Require e-signature is on for large estimates
- ☐ Accepted estimates show Accepted status
- ☐ Invoices are created from the estimate, not from scratch
- ☐ Progress invoicing is turned on if you bill in stages
- ☐ You review Estimates & Progress Invoicing Summary by Customer every month
- ☐ Customer payments in the bank feed are matched to existing records
Related reading
- QuickBooks Online Basics for Beginners: 10 Things to Know
- Getting Started in QBO: Opening Balances and Chart of Accounts
- Import Customers, Vendors and Products from Excel
- Inviting Staff and Accountants: User Permissions
- QuickBooks Online Bank Feeds Explained: Match, Add and Rules
- How to Clean Up Undeposited Funds
This article is general educational information, not tax, legal or financial advice. For decisions about your own situation, consult a qualified professional. QuickBooks Online screens, menu names, plan features and prices change often; check your current screens and Intuit's official guidance before you act. The businesses and customers in the examples are fictional.
QuickBooks is a registered trademark of Intuit Inc.; not affiliated with or endorsed by Intuit.
Sources
- Intuit QuickBooks Help: Create and send estimates in QuickBooks Online
- Intuit QuickBooks Help: Convert an estimate into an invoice
- Intuit QuickBooks Help: Set up and send progress invoices
- Intuit QuickBooks Help: How to use progress invoicing
- Intuit QuickBooks Help: Request a customer deposit on an estimate
- Intuit QuickBooks Help: Request e-signatures on estimates
- Intuit QuickBooks Help: Copy an estimate to a purchase order