Partial Payments, Discounts, Refunds and Credits in QuickBooks Online: Record Every Invoice Change Without Breaking A/R
Sending an invoice is the easy part. The trouble starts afterward: a customer pays half, asks for a price break, needs part of the money back, or sends more than the invoice total. If each of those gets entered as a plain "deposit," or the invoice amount gets edited by hand, your Accounts Receivable (A/R) and bank balances stop agreeing, and month-end reconciliation turns into a hunt.
This guide walks through the core Invoice → Receive payment flow in QuickBooks Online (QBO), then shows which transaction to use for partial payments, discounts, credits (credit memos and delayed credits), refunds, overpayments and uncollectible invoices. It builds on the series starter, QuickBooks Online Basics for Beginners, and picks up where From Estimate to Invoice left off.
Who this is for ☐ Customers often pay invoices in installments ☐ You give discounts by typing over the price ☐ You record refunds as ordinary expenses and suspect sales look inflated ☐ A customer shows a negative balance and you are not sure why ☐ You have invoices that are months past due
1. The Basic Flow: Invoices Are "Owed," Payments Are "Received"
According to Intuit's help content, recording an invoice records what the customer owes, and unpaid invoices sit in Accounts Receivable on the balance sheet. When the money arrives, you record Receive payment against that invoice so A/R goes down. If you create the invoice and then also add the bank deposit as new income from the bank feed, revenue is counted twice and the invoice stays open.
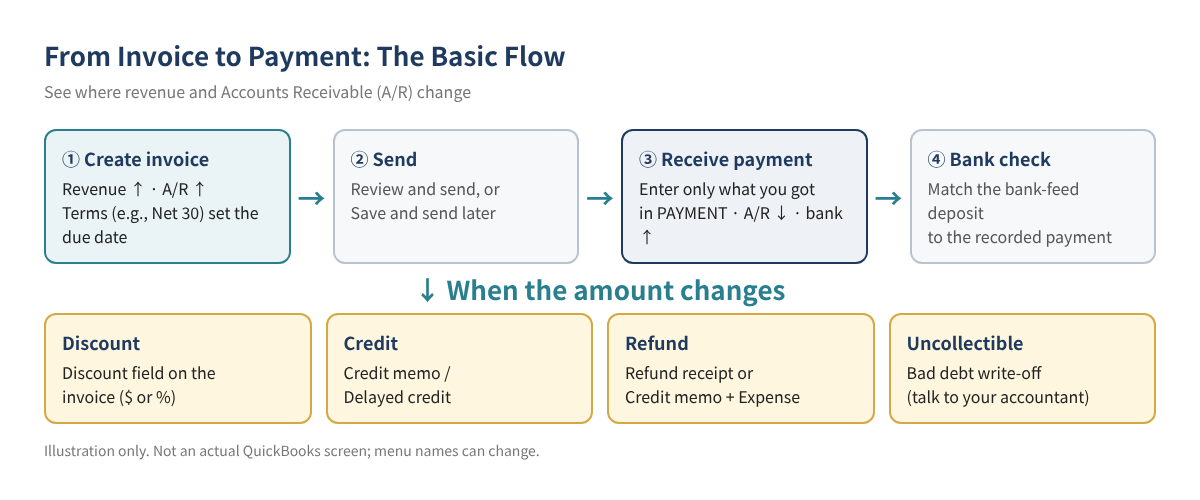
Each change in amount calls for a different transaction. Use this table as a map for the rest of the guide.
| Situation | Transaction to use | Effect on the books (summary) |
|---|---|---|
| Bill a customer | Invoice | Revenue ↑, A/R ↑ |
| Customer pays in full or in part | Receive payment | A/R ↓, deposit account ↑ |
| Price reduced on the invoice itself | Discount field on the invoice | Lower amount billed from the start |
| Reduce the balance of an invoice already sent | Credit memo | A/R ↓; original invoice unchanged |
| Promise to take it off the next bill | Delayed credit | No sales impact until applied to an invoice |
| Give money back for returned/canceled items | Refund receipt | Refund recorded from the chosen bank account |
| Refund a paid invoice (no return) | Credit memo + Expense, linked in Receive payment | A/R and bank both stay correct |
| Money you will never collect | Bad debt write-off (credit memo method) | Bad debts expense on the P&L |
Tip The "effect" column summarizes Intuit's help descriptions. How these items are treated on a tax return depends on your accounting method (cash or accrual) and the facts, so confirm with your tax professional.
2. Create Invoices That Need Fewer Fixes Later
A clean invoice makes every later step simpler. It helps to have customers and products already set up (see Import Customers, Vendors and Products from Excel).
- Select + Create (or + New on some screens), then Invoice. You can also go to Sales (Sales & Get Paid) → Invoices → New invoice. If the menu looks different, type "invoice" in the search bar.
- Choose the customer, or select + Add new.
- Check Invoice date, Terms and Due date. "Net 30" in Terms means payment is due within 30 days and drives the due date.
- On each line, pick the product or service and enter quantity and rate.
- Enter any discount in the Discount field (Section 3). Sales tax appears if it is set up and the invoice has taxable items.
- Select Review and send to email it now, or Save to send later.
Note Intuit says invoicing is limited on QuickBooks Online Free and Lite. Features and prices by plan change often, so check your current subscription screen.
3. Discounts: Stop Typing Over the Price
If you lower the unit price to give a discount, nobody can tell later what the regular price was or how much you gave away. QBO has a separate discount field; turn it on first.
Turn on the discount field
- Open Settings ⚙ → Account and settings.
- On the Sales tab, select Edit next to Sales form content.
- Turn on Discount, then select Save → Done.
Intuit notes that turning the discount field off while creating an invoice also turns it off in your account settings.
Discount methods compared
| Method | How to enter it | Best for | Watch out for |
|---|---|---|---|
| Percentage (%) | Choose % in the Discount field and enter the rate | Across-the-board offers like "5% off" | Check the sales tax order |
| Flat amount ($) | Choose $ in the Discount field and enter the amount | "$100 off this job" | — |
| Discount item (negative line) | Create a discount product/service and enter a negative rate | Keeping a named promotion on the invoice | Per Intuit, this method takes whole amounts only, not percentages |
If you collect sales tax, decide whether the discount applies before tax. Intuit explains that the double-arrow icon next to the discount field swaps the order of the tax and discount fields so the discount is applied before sales tax is calculated. The correct order can depend on the state and the type of discount, so check your state's sales tax guidance (sales tax gets its own post, #13 in this series).
4. Recording Payments and Partial Payments
Receive payment step by step
- Select + Create → Receive payment.
- Pick the Customer. Their open invoices then appear under Outstanding Transactions.
- Enter the actual Payment date.
- Choose the Payment method and enter the reference number (such as a check number) and the amount received.
- In Deposit to, choose the account where you want to record the payment.
- Check the invoice under Outstanding Transactions. For a partial payment, enter only the amount the customer paid in the PAYMENT field.
- Select Save and close or Save and new.
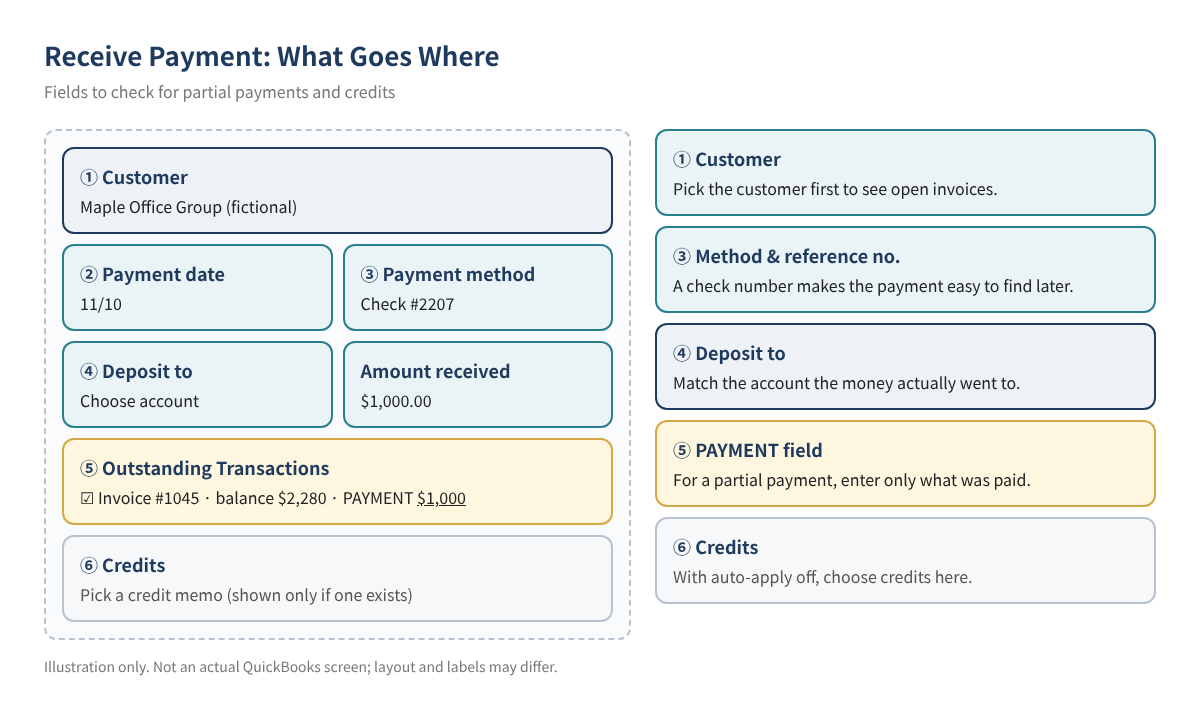
After a partial payment, the invoice stays open for the remaining balance. When the rest comes in, record another Receive payment the same way. Avoid editing the invoice down to the amount received to make it look paid: that understates revenue and erases the record that the customer still owes you.
Tip Your Deposit to choice should match how the money actually reached the bank. If you deposit several customers' checks together, see Clean Up Undeposited Funds for how grouped deposits work and how to fix a messy balance. When the deposit shows up in the bank feed, match it to the existing record rather than adding it again (see QBO Bank Feeds: Match, Add and Rules).
5. Credits: Credit Memo vs. Delayed Credit
Use a credit when you are not handing money back but need to reduce what the customer owes. Intuit's help separates the two like this.
| Credit memo | Delayed credit | |
|---|---|---|
| When to use | Reduce the customer's open balance now | Take it off a future bill |
| Current balance | Reduced immediately | Unchanged |
| How it is applied | Fully or partly to an invoice; can be applied in Receive payment | Added as a line item on a future invoice |
| Sales reports | Affects sales reports even if not applied | No effect until applied to an invoice |
Create one
- Select + Create → Credit memo or Delayed credit.
- Enter the customer, date, product/service and amount. If you issue credits often, a dedicated credit service item saves time.
- Select Save and close.
Check the "Automatically apply credits" setting
Where a credit memo lands depends on Automatically apply credits, found under Settings ⚙ → Account and settings → Advanced tab, in the Automation section.
- On: the credit goes to the oldest unpaid invoice, and any excess moves to the next-oldest. With no unpaid invoices, the credit memo stays unapplied and the customer balance shows as negative.
- Off: a Credits section appears in Receive payment, and you choose which invoices to apply credits to and when. Unapplied credits leave both the invoice and the credit memo open on the customer balance report.
To apply a credit manually with auto-apply off, open Receive payment, choose the customer, check both the invoice and the credit memo, and enter the credit amount in the invoice's PAYMENT field. No money changed hands, so Intuit says to leave fields such as Amount received blank.
Caution Intuit warns that adding a delayed credit to an invoice from a prior period changes that period's balances. Check dates carefully if the period is closed or already handed to your accountant.
6. Refunds: First Ask Whether Anything Was Returned
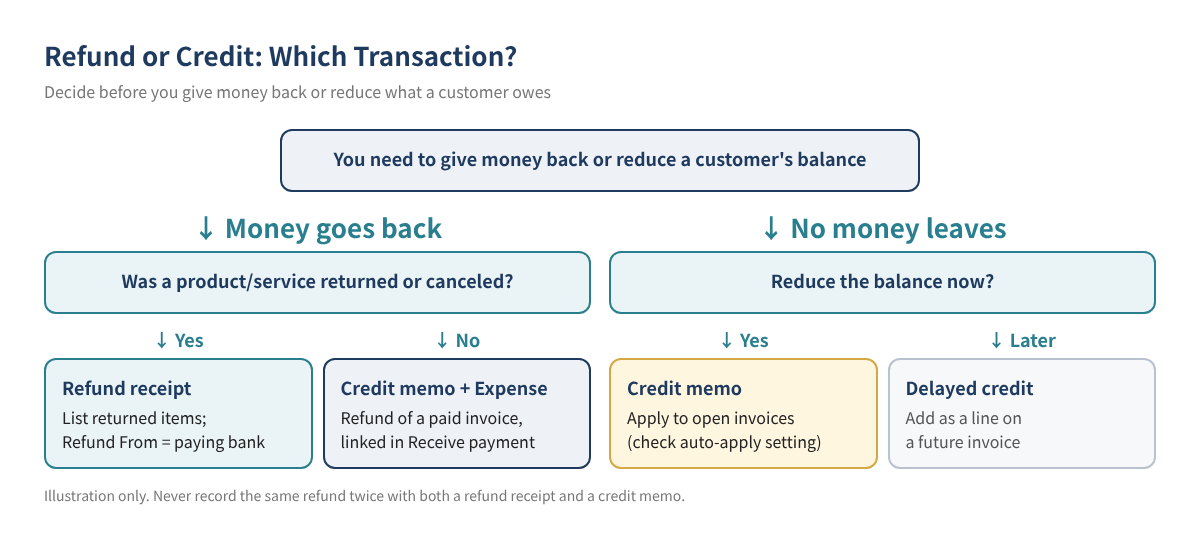
A. Refund for returned or canceled items: Refund receipt
- Select + Create → Refund receipt (shown as Give refund on some screens).
- Choose the customer and the Payment method used for the refund.
- In Refund From, choose the bank account where the customer's payment was deposited.
- Enter the returned products or services with quantity and rate.
- Select Save and close.
Intuit stresses that you should not also create a credit memo for an item refund, because the refund would be recorded twice. A refund receipt only records the refund; you still need to write the check or process the refund through your card terminal or payment processor separately.
B. Refunding a paid invoice with no return: Credit memo + Expense
- Find the invoice in your invoice list and use More actions → Create a credit memo. Keep only the amount you are refunding.
- Select + Create → Expense. Payee is the customer, Payment account is the bank account the money left from, and Category is your Accounts Receivable (A/R) account, as Intuit's article describes.
- Select + Create → Receive payment, choose the same customer and check both the credit memo and the expense. They offset to $0; then save.
This keeps A/R and the bank balance in agreement. When the refund appears in the bank feed, match it to the expense instead of adding a new one.
7. Overpayments Become Customer Credits
When a customer sends more than the invoice total, enter the full amount received in Receive payment and apply only the balance due to the invoice; the rest stays on the customer's account as a credit. Intuit lists three options for that extra money: apply it to another open invoice, refund the customer, or record it as a tip. If another invoice is open, you can select it in Receive payment to use up the remaining amount.
8. Uncollectible Invoices: Check Before You Write Off
Deleting an invoice that will never be paid also deletes the original sale. Intuit's help describes this approach instead:
- Run Accounts Receivable Aging Detail from Reports to identify the invoices.
- In the chart of accounts, create an Expenses account with the detail type "Bad debts."
- Create a Non-inventory product/service called "Bad debts" linked to that account.
- Create a credit memo using that item and apply it to the invoice in Receive payment.
- Confirm the amount appears under Bad debts on the Profit and Loss report.
Caution Intuit notes that for accrual-basis books a write-off can sometimes be deductible, and it recommends consulting your accountant before writing off any debt. On cash-basis books the amount may never have been reported as income, so the treatment can differ. Talk to your accountant first.
9. Worked Example: Partial Payment, Credit and Overpayment on One Invoice
Fictional "Sunrise Catering" billed its customer "Maple Office Group" for an event on November 1. Sales tax is left out to keep the example simple.
| Item | Qty | Rate | Amount (Sample values) |
|---|---|---|---|
| Lunch catering (per person) | 40 | $55.00 | $2,200.00 |
| Delivery and setup | 1 | $200.00 | $200.00 |
| Subtotal | $2,400.00 | ||
| 5% discount (Discount field) | −$120.00 | ||
| Invoice #1045 total (Terms: Net 30) | $2,280.00 |
- 11/10 The customer mails a $1,000 check. In Receive payment, check invoice #1045 and enter $1,000 in PAYMENT. Balance: $1,280.
- 11/12 Part of the beverage service was missed, so you agree to an $80 reduction. No money goes back, so create an $80 credit memo and apply it. Balance: $1,200.
- 11/28 The customer sends $1,250. Enter $1,250 as the amount received and apply $1,200 to the invoice. The invoice is paid in full and $50 remains as a customer credit.
- Wrap-up Apply the $50 to the next invoice or refund it. If you refund it, link it through Receive payment as in Section 6B so A/R ends at exactly zero.
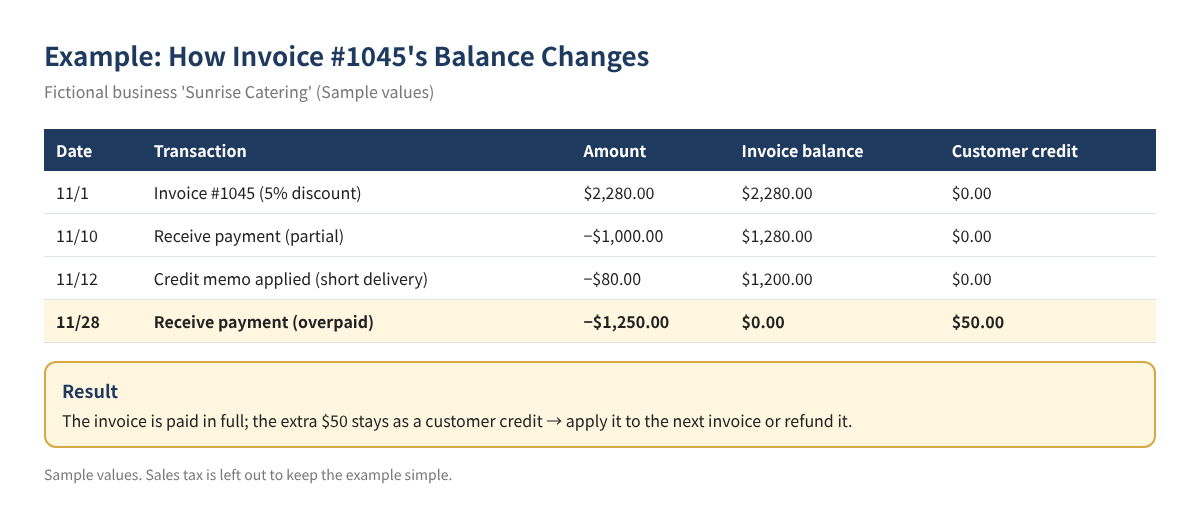
Check the math: $2,280 − $1,000 − $80 − $1,200 = $0, and $1,250 − $1,200 = $50 of credit. A −$50 customer balance on the customer balance report means that credit is still waiting to be used.
10. Common Mistakes
- Adding customer deposits as new income from the bank feed: revenue doubles and the invoice stays open. Match to the open invoice or use Receive payment.
- Editing the invoice after a partial payment: revenue drops and the receivable disappears. Enter only what was paid in PAYMENT.
- Burying discounts in the unit price: no record of the discount. Use the Discount field or a discount item.
- Recording an item refund with both a refund receipt and a credit memo: the refund counts twice.
- Creating credit memos without knowing the auto-apply setting: credits may land on an old invoice you did not intend.
- Deleting uncollectible invoices: the original sale disappears. Use the bad debt method after talking to your accountant.
11. FAQ
Q1. One customer paid three invoices with one check. How do I record it?
In Receive payment, choose the customer to see all open invoices, check the ones being paid, and make sure the PAYMENT amounts add up to the amount received. One payment record also makes it easy to match the single bank deposit.
Q2. A customer shows a negative balance. Is that an error?
Usually it means an unapplied credit or overpayment. Find the credit memo or unapplied payment on the customer record and apply it to the next invoice or refund it.
Q3. The card processor deposited the payment minus its fee. What happens to the invoice?
Generally the invoice stays at its full amount and the difference is recorded as a fee expense. Per Intuit, payments received through QuickBooks Payments are recorded to the accounts for you, while payments through an outside processor are recorded manually. The exact steps depend on your processor and any integration, so settle on a method with your bookkeeper.
Q4. Credit memo or refund receipt?
If money goes back to the customer for returned or canceled items, use a refund receipt. If no money goes back and you are only reducing what they owe, use a credit memo. For a paid invoice refunded without a return, use a credit memo plus an expense (Figure 3).
Q5. Can I apply a credit to last month's invoice?
Yes, but depending on the date it can change numbers in a period you already reviewed. If that period is closed or was used for a tax filing, talk to your accountant first.
12. Checklist
- ☐ Turned on the Discount field in Sales form content
- ☐ Checked the Automatically apply credits setting on the Advanced tab
- ☐ Recorded every customer payment with Receive payment or matched it to an open invoice
- ☐ Entered only the amount received for partial payments
- ☐ Recorded each item refund once, with a refund receipt
- ☐ Actually processed refunds with the outside payment processor
- ☐ Reviewed A/R Aging for old balances and negative customer balances
- ☐ Talked to an accountant before writing off bad debt
13. Related Reading
- QuickBooks Online Basics for Beginners: 10 Things to Know
- Set Up Opening Balances and the Chart of Accounts
- Chart of Accounts Examples by Industry
- Import Customers, Vendors and Products from Excel
- Users, Permissions and Two-Step Verification
- QBO Bank Feeds: Match, Add and Rules
- From Estimate to Invoice
- Clean Up Undeposited Funds
- Find Duplicate Transactions and Reconciliation Differences
This article is general educational information, not tax, legal or financial advice. Consult a qualified professional about your own situation. QuickBooks Online screens, menu names, plan features and prices change frequently, so check the current screens and Intuit's official guidance before you act. All businesses and customers in the examples are fictional.
QuickBooks is a registered trademark of Intuit Inc.; not affiliated with or endorsed by Intuit.
Sources
- Intuit QuickBooks Help: Create invoices
- Intuit QuickBooks Help: Understand invoices in QuickBooks Online
- Intuit QuickBooks Help: Receive and process payments
- Intuit QuickBooks Help: Add a discount to an invoice, estimate or sales receipt
- Intuit QuickBooks Help: Create and apply credit memos or delayed credits
- Intuit QuickBooks Help: Refund your customer for an item or service
- Intuit QuickBooks Help: Refund your customer for a paid invoice
- Intuit QuickBooks Help: Handle a customer credit or overpayment
- Intuit QuickBooks Help: How to write off bad debt in QuickBooks Online